Thursday, August 4, 2016

Organizing: Rulers

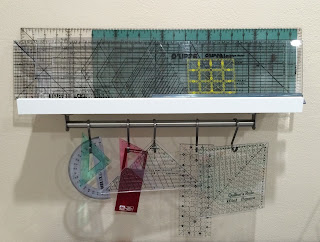
A few weeks ago, I shared with you my thread storage project (that I am loving) and I mentioned that I would tackle my rulers next.  Well, I meant it!  With a little research and not much expense, here is what I came up with.

Ruler Storage
Ruler Storage

This is made up of a 21 3/4 inch picture ledge and a 15 3/4 inch rail with 2 3/4 inch hooks, all from IKEA and totaling roughly $20.  We (I mean my husband!) mounted the rail to the underside of the picture ledge, so there are fewer holes in the wall.

Now I can hang my smaller rulers from the s-hooks and my longer rulers can stack on the picture ledge, horizontally.  You'll see a little 4-inch square ruler up there.  The hole on that one is too small for the s-hooks, so I'll use a small binder clip (you know the black ones with the silver wire clips?) for that one.  The binder clip will clip to the ruler, then the silver wire will hang on the s-hook.

I feel like I have SO much more space on my work table now that all of these things are up off the table, and they are still easy to get to because I mounted this unit right above the table top.

Friday, July 29, 2016

Farmer's Wife Quilt-Along: Re-Worked Blocks

Now that I'm almost done with my Farmer's Wife Quilt blocks, I find I don't like a few so I have re-made them.  Check out each block before and after.
  • Block 81 - Snowball
  • Block 63 - Ozark Maple Leaf
  • Block 30 - End of Day
  • Block 29 - Economy

Saturday, July 23, 2016

Organizing: Thread Storage

I am very fortunate that my husband is handy.  When I was inspired by a variety of posts on Pinterest, he was eager to help me improve my thread storage situation.

For years I've been using the plastic boxes with posts in them for storing spools of thread.  While the boxes are clear, I was never able to really see what I had unless I opened the box, and some of the newer spools of thread are too tall.  As for my collection of bobbins, always in a tangled mess in a box or drawer.  I found myself buying new spools of thread in colors I already had because I didn't realize I already had it.  Plus, I kept winding new bobbins with colors I already had bobbins for.  If you know me, you know that drives me crazy.  I like organization and efficiency.

I decided to use two ideas for my solution.  You can see here the awesome shelf my husband made for me.  I decided against the nails on the front of each shelf for the bobbins.  Something about having all of those nails sticking out didn't sit well with me.

Thread Storage
Thread Storage

If you can zoom in on the spools of thread, you can see that we made the spaces tall enough so that I can include the bobbin with its matching spool of thread, placing it on top and using a short golf tee to hold it in place.  This was another idea I saw on Pinterest.  I've also seen drinking straws in place of the golf tee...you can cut them to the size you need.

I'm loving this solution.  All of my thread is organized by color, so I can quickly find what I need or know that I need to buy a new color.  The bobbins stay with the matching spool and I don't have a mess of thread to untangle.

Now, on to my rulers!

Friday, July 22, 2016

Farmer's Wife - Week 34

This week we'll be doing more HSTs and a few flying geese, and another set of almost twin blocks.  The blocks we are doing are:

  • Block 41 - Friendship Star
  • Block 42 - Fruit Basket
  • Block 45 - Grape Basket

Farmer's Wife - Week 33 - Our Blocks

Well, we took quite a break - traveling and life - but we are back.  Lots of HSTs for week 33 of the Farmer's Wife Quilt-along!  Read on to see how our blocks came along.


Saturday, July 16, 2016

Providence Quilt Block - Blue & White Sampler

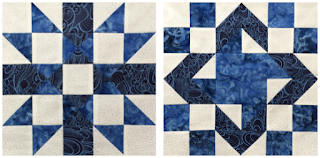
I have two more blocks completed for my Blue & White Sampler, Providence and a mystery block.  If you know the name of this block, please let me know!


Blue & White Sampler Blocks

La Passacaglia - Three More Rounds

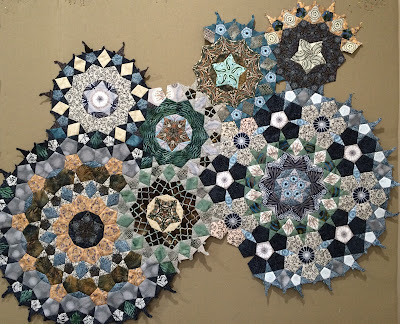
I've made more progress on my La Passacaglia quilt project, having added three more rounds or rosettes to the collection.  I'm working on another large round that I'll share when it is done, but you know how long these can take.

La Pasacaglia Quilt - In Progress
La Passacaglia Quilt - In Progress

Earlier this month I had the opportunity to share English Paper Piecing with my sister, so my next round will start with the center star that she started!

I'm having fun with the color play with this project, discovering how differently the same fabric appeals to me based on the size of the piece it is used in.  For example, that orange-y fabric in the large round at the lower left is one I added to the mix because I like to have some gold-ish color fabrics in multi-color quilts.  Separately, I like the fabric, but I wasn't really wild about how it looked in that particular round; I think there is just too much of it.  But check out that fabric in the stars around the rosette at the top right; it looks great as the points of the stars!  I like it so much, I'm going to use it again for star points and will also use it for the long diamond shapes.

Check out all of my progress on the La Passacaglia quilt project.