- Block 33 - Farmer's Puzzle
- Block 65 - Peaceful Hours
- Block 110 - Wood Lily
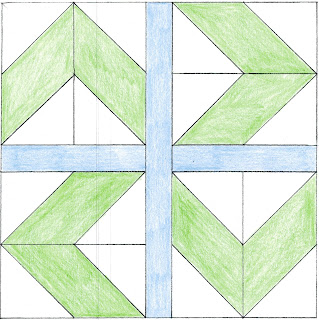
Block 33 - Farmer's Puzzle
This block has 8 sections that are paper pieced using the templates provided here. Notice that there are two different (4 of each) pieces provided for this block; the difference is that they are a mirror image of each other. It will be important to be careful about proper color placement, depending on how you choose to place your fabrics.The center strips are made from 1 inch strips. The long strip is 6 1/2 inches long and the two short strips are 3 1/4 inches long.
 |
| Farmer's Wife - Block 33 - Farmer's Puzzle |
Block 65 - Peaceful Hours
Here we have quite a few sections for paper piecing. The templates can be found here. As above, be sure to be careful with using the templates. The center section should be fairly simple, but of the remaining FPP templates are two different templates that are mirror images of each other, so it will be easy to mix them up if you aren't paying attention. It will be helpful to mark your colors for each section in each template before cutting them apart.In addition, you will need to make four HSTs for the corners. If you still need the tutorial, find it here. Start with 2 3/8" squares, two of each color, to make these; use the tutorial two times to make four HSTs. Be sure to trim the HSTs to 2" square before assembly.
 |
| Farmer's Wife - Block 65 - Peaceful Hours |
Block 110 - Wood Lily
For this block, we have paper piecing templates, but I also have a strip piecing option (below block image) for the chevron sections if you want some variety. Personally, I don't want to do all of those little FPP parts.To start off, the center should be cut 1 7/8" square and set aside for final assembly.
The four triangle sections should be fairly simple using paper piecing. If you wish to FPP the remaining eight chevron sections, you'll have all of the sections complete and ready for final assembly.
 |
| Farmer's Wife - Block 110 - Wood Lily |
Optional: If you do not wish to FPP the chevron sections, you can use these instructions for strip piecing. This method is a good alternative if you are planning to have the stripes in the chevrons use the same fabric selection for all sections, like I do. You will use the FPP templates for these sections as guides, so go ahead and cut them out, including the seam allowances (cut on the dashed line).
Step 1: From the first four fabrics on the chevron strip, cut a 1 inch wide strip at least 8 inches long. From the last fabric on the chevron strip (white on my drawing), cut a 1 1/2 inch wide strip that is at least 8 inches long.
 |
| Cut Strips |
Step 2: Sew these strips together in the order you want them to appear in the chevron. Iron the seams in the same direction, pressing the entire piece as flat as possible.
 |
| Sew and iron strips |
Step 3: Find four of the FPP templates that are the same and lay the FPP templates on the strips, lining up the lines on the template with the seam lines.
 |
| Lay template on strips, aligning lines with seams |
Step 4: Using whatever method works for you, cut around the template. I'm using a rotary cutter, pressing down hard on the ruler to keep the fabric from shifting. You could also pin the template to the fabric and cut around the edge with scissors.
 |
| Cut around templates |
Step 5: Now repeat this process for the other four FPP templates.
 |
| Repeat for mirror image pieces |
You should now have eight sections that are ready to assemble into the final block.
See the instructions for Week 20 of our Farmer's Wife Quilt-along.
No comments:
Post a Comment