 |
| Dog-Eared Triangle |
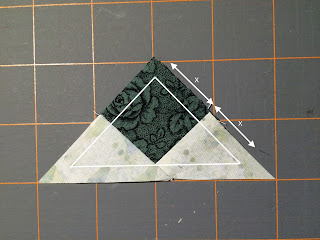
I've found this triangle used quite a bit while making the blocks for the Farmer's Wife Quilt-Along. It is made up of a square in the center with two smaller triangles attached to adjacent sides of the square to form a larger triangle.
Read my tutorial for a fool-proof way to make these perfectly every time.
Let's start by looking at the geometry of the finished triangle. The center piece is a square that measures half the size of the two equal sides of the finished triangle. For example, if the two equal sides of the finished triangle are 2 inches, then the square in the center is one inch. That means that if we were to take those two small triangles and butt the long edges together, they would form a square that is also one inch. The size of the center square piece is the central measurement to the instructions below and called X in the instructions.
 |
| Geometry of the Dog-Eared Triangle |
- Start by cutting one square that is X + 1/2 inch from fabric A.
- Next, cut one square that is X + 7/8 inch from fabric B.
- Draw a diagonal line from corner to corner on the larger square cut from fabric B.
- Cut on that line to create two triangles.
- Sew the two triangles (B) to the square (A).
- Trim the tails and iron flat.
There are a lot of different, interesting ways this can come together, so keep an eye out for this when piecing those hard-looking blocks!
- With an HST in the center square.
- With an Hourglass block in the center square.
- With an HST, split and used in the triangle spots.
Hint: We'll be using this method on some of the blocks in the Farmer's Wife Quilt-Along.


No comments:
Post a Comment